Saturday, January 28, 2012

Pizza! Pizza!

Wednesday night I tried a recipe form Ezra Poundcake's blog for "Grandma's Pizza" actually known as "Nonna's Pizza" in any good Italian family. A Sicilian style crusted pizza, made in a pan with cheese and tomatoes. The toppings are sparingly applied but the result is fantastic.


Rising Dough

Baked to perfection.

So first the crust. It did not sound as if this would be enough but I followed the instructions and sure enough it covered the pan. This was yummy and I will make it again. Very fresh tasting and light.

Dough:

  • 3 tablespoons olive oil
  • 3/4 cup water
  • 1 1/2 cups (8 1/4 ounces) bread flour
  • 2 1/4 teaspoons instant or rapid-rise yeast
  • 1 teaspoon sugar
  • 3/4 teaspoon salt
    Topping:
  • 1 (28-ounce) can diced tomatoes
  • 1 tablespoon olive oil
  • 2 garlic cloves, minced
  • 1 teaspoon dried oregano
  • 1/4 teaspoon salt
  • 8 ounces mozzarella cheese, shredded (2 cups)
  • 1/4 cup grated Parmesan cheese
  • 2 tablespoons chopped fresh basil
  1. For the Dough: Measure 2 tablespoons olive oil onto a rimmed baking sheet (18″ by 13″), and use your fingers to coat the sheet with oil.
  2. Measure water and remaining 1 tablespoon oil into a liquid measuring cup. Set aside.
  3. Using a stand mixer fitted with a dough hook, mix the flour, yeast, sugar, and salt on low speed. With the mixer running, slowly add water mixture, and mix until dough comes together, about 1 minute.
  4. Increase speed to medium-low, and mix until dough is smooth and comes away from sides of bowl, about 10 minutes.
  5. Place the dough on the oiled baking sheet, and turn to coat. Stretch dough to 10 by 6-inch rectangle. Cover with plastic wrap, and let rise in warm place until doubled in size, 1 to 1 1/2 hours. Stretch dough to corners of pan, cover loosely with plastic, and let rise in warm place until slightly puffed, about 45 minutes.
  6. Adjust oven rack to lowest position, and heat oven to 500 degrees F.
  7. For the Topping: Place tomatoes in colander, and drain really well.
  8. In a medium bowl, combine drained tomatoes, oil, garlic, oregano, and salt. Set aside.
  9. In a second bowl, combine mozzarella and Parmesan. Set aside.
  10. Sprinkle cheese mixture over the dough, leaving 1/2-inch border on all sides.
  11. Top with tomato mixture, and drizzle with olive oil. Bake until well browned and bubbling, about 12 minutes. (If the oven starts to smoke, lower the temperature or move your pizza up a rack.)
  12. Slide pizza onto a wire rack, sprinkle with basil, and let cool for 5 minutes. Serve.

*Cooks Note:  I would pre bake the crust a bit next time as it came out of the over softer than I like on the bottom. A good 10 or 15 minutes (watch carefully) before the toppings might bake it a bit longer before the topping gets too brown.

Preparing a post Lenten Treat

Beef Jerky is a staple around here after 40 days of no meat. We used to take it to church the night of Pascha services and eat it on the way home.
I generally like to get this done during the non fasting Pre Lenten period so I don't have to smell that delicious smokey beef drying out in the oven. Firstly, the beef. Never sure what to use but always looking for a sale, I found Bottom Round on sale for 2.69 a pound. Very lean and thick cut, it slices like a dream.  I have been cutting the beef a bit thicker these days and a sharp knife helps a lot.  After cutting into strips, I make a marinade of Hickory Smoke, Lawry's Seasoned Salt, pepper, Soy Sauce and Worcestershire sauce. Soak the meat over night then lay it out on a rack (I spray mine with Pam for easier clean up. I put the racks over pans lined with wax paper. Into the Convection oven for 1 hour at 165 then turn it down to 145 for 8 to 12 hours. I start checking to make sure its not too dry. I store it in a freezer bag in the fridge. Take care not to let any moisture accumulate in the bag, make sure its perfectly cool before bagging.  About $12 worth of beef makes about 3/4 gallon bag of Jerky but it does not last long at my house.

Sunday, January 22, 2012

International Mixed Grill

I made Naan. Yum. So good and pretty easy. I made it to serve the Crock pot Buffalo Chicken with Blue Cheese. I had some wings on hand and I didn't want to press the Buffalo thing too far so I made them Asian Style with Hoisin and orange juice.

Crock pot Buffalo Chicken
3 pounds of frozen Bnls Sknls Chicken breast
1 bottle hot sauce
1 package Hidden Valley Seasoning mix.

Place it all in the pot and let it go for 8 hours or so. Shred the chicken and enjoy. (Just so you know, I thought this was VERY salty. Not sure why)


Asian Style Wings are made with baked wings coated with a sauce and re baked. The sauce is 1/3 c hoisin, 1 tbl garlic minced, 1 t ginger minced, 1/2 t Cayenne,  juice of one orange and a teaspoon of honey. Mix and coat the wings. Bake again for 10 or 15 minutes watching not to burn the sweet sauce.


Naan.  I used the Arti Party recipe from Food Network. A raised yeast dough with yogurt and baking powder. Cut into 6-8 balls, roll out and dry fry in a very hot skillet. Brush with butter and sprinkle with salt.
  • 1 teaspoon active dry yeast
  • 2 teaspoons sugar
  • 2 cups all-purpose flour, plus more for rolling, see Cook's Note*
  • 1 teaspoon fine sea salt
  • 1/8 teaspoon baking powder
  • 3 tablespoons plain yogurt
  • 2 tablespoons extra-virgin olive oil
  • Melted butter for slathering on the finished naans
  • Coarse sea salt for sprinkling

Directions

In a large glass, dissolve the dry yeast and 1 teaspoon sugar with 3/4 cup warm water (about 100 degrees F). Let it sit on your counter until it's frothy, about 10 minutes.

Meanwhile, sift the flour, salt, remaining 1 teaspoon of sugar and baking powder into a large, deep bowl.

Once the yeast is frothy, add the yogurt and the olive oil into the glass, and stir to combine. Pour the yogurt mixture into the dry ingredients and add the kalonji and fennel seeds, if using, and gently mix the ingredients together with a fork. When the dough is about to come together, use your hands to mix. It will feel like there isn't enough flour at first, but keep going until it transforms into a soft, slightly sticky and pliable dough. As soon as it comes together, stop kneading. Cover the dough with plastic wrap or a damp tea towel and let it sit in a warm, draft-free place for 2 to 4 hours.

When you're ready to roll, make sure you have two bowls on your counter: one with extra flour in it, and one with water. The dough will be extremely soft and sticky-this is good! Separate the dough into 6 equal portions and lightly roll each one in the bowl of extra flour to keep them from sticking to each other.

Shape the naan. Using a rolling pin, roll each piece of dough into a teardrop shape, narrower at the top than at the bottom. It should be 8 to 9-inches long, 4-inches wide at its widest point and about 1/4-inch thick. Once you've formed the general shape, you can also pick it up by one end and wiggle it; the dough's own weight will stretch it out a little. Repeat this method with the rest of the dough. (If you're making the gluten-free version, you'll have better luck pressing the dough out with your fingertips, than rolling.)

Warm a large cast-iron skillet over high heat until it's nearly smoking. Make sure you have a lid large enough to fit the skillet and have a bowl of melted butter at the ready.

Dampen your hands in the bowl of water and pick up one of your naans, flip-flopping it from one hand to the other to lightly dampen it. Gently lay it in the skillet and set your timer for 1 minute. The dough should start to bubble.

After about 1 minute, flip the naan. It should be blistered and somewhat blackened, don't worry - that's typical of traditional naan! Cover the skillet with the lid and cook 30 seconds to 1 minute more.

Remove the naan from the skillet, brush with a bit of butter and sprinkle with a little coarse sea salt. Place the naan in a tea towel-lined dish. Repeat with the rest of the naans and serve.

This recipe is from Arti Party of the Food Network


Thursday, January 19, 2012

Grilled Salmon with Artichoke Salsa, Pan Gratin Potatoes


Grilled Salmon...so easy. I placed the side of salmon on Non Stick foil, doused with olive oil and sprinkled with Crazy Jane's Crazy Mixed Up Salt. Grill till perfection. I like it moist and tender in the thick parts but crispy on the belly side.


Artichoke hearts, chopped Red Onion, Capers, Garlic, Halved Cherry tomatoes with a drizzle of lemon juice and olive oil. Salt and pepper to taste, marinate and top that salmon. You won't be sorry!

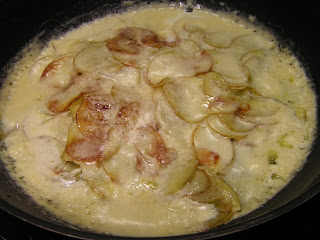
Pan Gratin potatoes. Spuds sliced super thin, sauteed in a bit of olive oil, flip when browned then flood the pan with a bit of cream, add some cheese, salt and pepper then cover till potatoes are tender. Slice into wedges to serve. Oh so good.

Wednesday, January 18, 2012

Jalapeno Popper Dip

A recipe from BakedBree

Jalapeno Popper Dip

Ingredients

  • 2 8-ounce bricks cream cheese, room temperature
  • 1 cup sour cream
  • 3/4 cup pickled jalapeno peppers, chopped
  • 2 fresh jalapenos, chopped finely
  • 1 teaspoon salt
  • 1/2 teaspoon fresh pepper
  • 1 cup Panko crumbs
  • 1/2 teaspoon Montreal steak seasoning

Directions

  1. 11 Preheat oven to 375 degrees. Mix together cream cheese, sour cream, pickled jalapeno peppers, fresh jalapenos (reserve a bit for the top), salt, and pepper.
  2. 22 Spray a 1-quart casserole dish with cooking spray. Pour the cream cheese mixture into the dish. Top with Panko crumbs and Montreal steak seasoning.
  3. 33 Bake for 30 minutes or until golden brown and heated through. Add reserved fresh jalapeno to the top and serve with tortilla chips.

Jalapeño Popper Dip


Yield: 6 to 8 servings
Prep Time: 15 minutes
Cook Time: 30 minutes
Total Time: 45 minutes

Ingredients:

16 ounces cream cheese, at room temperature
1 cup mayonnaise
8 pieces of bacon, cooked and chopped up
6 jalapeños, minced (if you can't get fresh, substitute a 4-ounce can diced jalapeño peppers, drained)
2 cloves garlic, minced
½ teaspoon cumin
1½ cups shredded cheddar cheese
Topping:
1 cup panko breadcrumbs
1 cup grated Parmesan cheese
4 tablespoons unsalted butter, melted

Directions:

1. Preheat oven to 375 degrees F.
2. Combine the cream cheese, mayonnaise, bacon, jalapenos, garlic, cumin and cheddar cheese in a mixing bowl. Pour the mixture into a casserole dish or 9x13 baking dish.
3. Combine the panko breadcrumbs, Parmesan cheese and melted butter in a small bowl, tossing with a fork until the mixture is evenly moistened. Sprinkle evenly over the cream cheese mixture.
4. Bake in the preheated oven for 25 to 30 minutes, until the top is golden brown and the dip is bubbling. Let rest for 5 minutes before serving. Serve with your favorite tortilla chips, crackers, vegetables, etc.

I made this as a cold dip with the following changes:
1 large Jalapeno chopped whole
1/4 + minced pickeled Jalapeno
1 t chipotle powder
Put the parm in the mix and serve cold. 

Sunday, January 15, 2012

Beef and Barley Vegetable soup


Another soup supper Sunday at our house. I like cooking this stuff all day and melding flavors into a savory warm treat on a Winter's day even though it was temperate out today.

1 to 1 1/2 pounds stew beef
1 T oil
1/2 c flour
3 medium carrots
3 leeks
2 cloves of garlic chopped
8 ounces mushrooms
1 medium onion
1 pkg frozen pearl onions or 1 jar
1 cup red wine
4 cups beef broth
1 T Thyme
1/2 to 2/3 c barley

I dredged the beef in flour and browned in hot oil in batches. I deglazed the pan with the wine, scraping all the brown bits then added the onions, pearl onions,  carrots, mushrooms, leeks and garlic. To this I added the broth which covered the ingredients. After it came to a boil, I simmered it covered for several ours till the meat was tender. During the last hour, I added the barley. Season with salt and pepper to taste.

Served with some crusty bread you just can't go wrong.

Thursday, January 12, 2012

And........done.


Well, probably done. I will live with it a few days and probably add a stroke or 2 before I finalize it with varnish. I see that I forgot the Red Oxide final strokes so those will definitely get added.

Looking at this, I can see the major differences in subtlties that I missed in the original. Standing alone it's OK. Looking for another quick project to do. Perhaps during Lent this year I will see how  many icons I can get done. Brenda says we will have to biuld a room to store them in as I still have the very large church icons in the front room. Not sure what to do with all this practice stuff. Perhaps I just need to sand them  down and paint again.

Wednesday, January 11, 2012

3rd Highlight and some finishing work

The third highlight really brightens the faces and some darks were laid in. One of the highlights at the edge of the face is a bright apple green that Greek iconographers use to brighten the base tones of the skin. Some of the ground work for the garments is laid in and overall touching up.


The garments get the full treatment in this episode and the face gets the final strokes and touch of uncreated light. I may redo some of the Christ robes since I see them in photo now and am not completely happy with the forms created by the highlights. I still have to finish the border and check for any other undone parts I may have overlooked. Usually I like to live with it for a bit before the final varnishing. I place it somewhere where I will catch it off guard and see it with fresh eyes.

Monday, January 9, 2012

First and Second Highlights, Icon Progression

The process is slow now as we add the first highlights over the golden layer beneath. You may have noticed a blush applied to the cheek areas. Now we start to slowly build up the first highlight. A lighter version of the first golden color each applied with a liner brush in long strokes that contour the face. While theses photos emphasize the golden tone, in real life it is much more subtle that this. some of the lines are being laid in for the garments again and the eyes have been worked on. Darkening the eye "liner", whitening the cornea, deepening the pupils.


Now the second highlight is applied. A shade lighter than the first and a smaller area applied to allow each layer to show through at the edges. Again, a gradual blending in strokes, never looking solid and heavy and the lines always following the facial contours defining the curves and space. A third will follow, even lighter. The final few strokes in pure white "ozivki" will be applied lastly. They represent the pure "uncreated" light of Christ. traditionally some dark red will be applied aside the nose and cheek.

I am constantly overlaying the drawing on the painting to ensure that I have not wandered too far from the original forms. I have used white chalk to make guidelines for the garments. The chalk is easily brushed off after the paint dries.  The edges are looking rough right now but they will get a a coat of Red Earth paint and then left alone or possibly gilded. Depends on my mood at the time. If I use the Red Earth, there will be a final thick green line between the image and the red border.  Just a traditional thing.

You see there are no halo lines in this icon as the composition is so tightly cropped. The halo remnants are the gilded areas around the hand and behind he Maphorion in the upper right of the icon. Since Christ is so centrally located within another figure, this is a rare time where he has no halo at all. There will be no lettering on this icon either due to the composition. This would not be considered a "real" icon in this regard as the composition is too cropped for purists. This panel measures 9 inches by 12 inches, 3/4 inches thick. It is a plywood panel, birch with a prepared ground that has been heat finished onto the surface. The surface is very smooth and made for this type of paint. It is not suitable for egg tempera applications. It does, however, gild beautifully.

I am using a water based size and 23 K gold for the gilding. Normally I would use marine varnish and a 12 hour size. That produces a highly burnishable finish (polished) and makes the gold look like a mirror.


As I am online this a.m. (Tuesday) I can compare this with the original. The original is much more subtle of course. I am still and probably always will be a student with a much coarser hand and eye in the bitter end.  I make a lot of rookie mistakes that I see other students make. The over emphasis here and the incorrect form there. A failure to contrast light and dark. Takes a lot of practice to master these arts and I have neither the time nor inclination to be so disciplined. A sign of our times or a faithless lack of commitment?  Probably more the latter than the former. Just not willing to put in the hours. My kids are much more dedicated to their chosen careers than I am to my hobbies. I am afraid that if it does not come easy I lose interest or get frustrated (ask my saxophone). You would think that as many of these as I have painted, I would be better at it. The human condition.

Sunday, January 8, 2012

Eating Omaha one weekend at a time...


Our friends, Mat and Lori and us decided the New Year is an opportunity to try all those fabulous Omaha eateries we never quite seem to get around to. Our first foray into the Omaha restaurant pool was Mark's Bistro in Dundee.

There are no reservations for a party our size so we took our chances. As I suspected there was a long wait but the hostess told us they could set up a table for 4 upstairs. Private and exclusive we took the challenge. The service was great (I felt a bit sorry for the poor waitress who had to climb those stairs a few time to serve us.) The regular menu is a bit light but the special sounded good for the night  (I KNOW....never order the special) so against better judgement I ordered the Veal Chops.

For starters we had the Tomato Con fit and Cheese Plate. Both were great served with generous helpings of bread and the Na an or Pita that was served with the Con fit was very tasty. They have a corking fee if you bring a wine not on the menu. A great way to save a buck or two.

The main course for all of us was a bit of a disappointment. Mat and I ordered the Veal which was under seasoned and not as caramelized as I would have liked. Lori's Salmon was OK and Brenda ordered a salad. Overall and OK experience. I would be willing to try once more, the others I am not so sure.

We have a long list to go and I hope for the best.

Coq Au Vin with a twist


Tonight was an all day affair. I love long, slow cooking with a Dutch oven and some nice country peasant ingredients. I wanted a stew with chicken but not red and tomato-y but white and creamy.

I have 4 large chicken breasts that I boned and cut into 4 huge chunks each. Skin on

1 cup flour
1 T salt
1/2 bottle Chardonnay
3 T oil
3 carrots rough chop
1 medium onion rough chop
3 salks celery rough chop
2 cloves garlic minced
4 cups chicken broth
8 baby red potatoes quartered
8 ounces white mushrooms quartered
2 t thyme
2 bay leaves
Salt and pepper

Mix the salt into the flour. Heat the oil in the Dutch oven, medium heat. Dredge the chicken in the flour and cook unitl golden in batches. Set aside the chicken. Add a little oil if needed to the pot and cook a few tablespoons of the flour until it is a dark copper penny color. Stir the roux constantly. Once browned, add the wine and stir. It will thicken then add the broth.

Mix in the vegetables, spices and tuck the chicken pieces into the fray. Cover the pot and place in the oven at 250 for the next few hours. Check the seasoning and add salt and pepper to taste.

I am re thinking leaving the skin on the chicken. It browned nicely but cooking it just made it limp and rubbery. I removed it before the final serving. In the future I might just skin the chicken before flouring.  The chicken was very tender and fallind apart. The potatoes held up nicely. If we were big Carb eaters I would have made some biscuits to serve with it. Yum.

Saturday, January 7, 2012

Iconographical Progression


I layed in the "proplasmos" and the first layer of "sankir"  to the basic drawing. Basically I have painted the base coats before the highlights begin. I changed my mind a bit about the red and made it darker as well as the maphorion which is almost purplish. Trying to decide if I want to just do all the lines in assiste (gold) and paint them in. The paint is still wet on the arm and hand which is why it looks a bit lighter. I think the Christ head is in a peculiar position on this particular protoype but it all seems to work compositionally. This model is called "Pelegonitissa" Mother of Tenderness. The Child in a playful position while the Virgin looks deeply sad.

After this I will make sure the drawing matches up and make any corrections that I may have colored outside the lines a bit. I will bring the flesh tones up in the next few sessions, essentially finishing the faces and hand before I work on the garments too much.

The Dessert Party Redux

You might remember last year we resurrected our Dessert Party with wild success. We are thinking about it again with Co Hosts Matt and Laurie Fangman. I have already started scouting possible additions to the menu. Last year's was hard to beat but there is always some confection on the horizon that can be a welcome addition. Space is limited and the guest list is not as big as parties past. I added a few recipes to my Pintrest account so I can track them in a hurry of I need a reference on the fly.

Lots of planning and listing ahead. Recipes and photos to follow but we still need to pick a date....

Friday, January 6, 2012

Shrimp Salad with Creamy Caesar


Chopped Romaine and Shrimps with a creamy Caesar dressing

1 t Dijon Mustard
1 T mayonaise
1 clove garlic chopped
3 T lemon juice
1 T Worcestershire
a good squeeze of anchovy paste
2 ounces cream cheese
1/2 cup oil
1 T Tarragon vinegar
1 egg yolk
Milk to thin if necessary
Parmesan grated
Salt and Pepper

I put all this but the milk and Parmesan in a 4 cup measure and used the blender stick. Adjust the acidity with vinegar and thin with milk. Salt and pepper to taste. We grated Parmesan on the salad and added croutons and roasted shrimps.


Current Project

Haven't painted since we finished the kitchen and well before that so I decided to pick a new project. I ordered some boards, had a couple of inquiries for icons but the pricing seems to frighten off any commissions so I am choosing my own subjects to paint. I decided I need a bit of practice on face and skin so I choose a prototype that was mostly that. Kind of a close up view of an actual icon. The prototype is this:
I have already started but mine is closer yet to this and cropped more tightly but I am keeping true to the color scheme. Not much gold on this one but I am using one of the new thicker boards. I had hoped to run it through the router first to camfer the edges but I am too lazy.

Thursday, January 5, 2012

A Quick and Easy Bread that won't disappoint...

Some of the ladies at work are having issues with yeast. Not sure why or how they can't get a decent rise  but I have a great recipe for a really crusty, great loaf of bread. You will need a very clean  hot oven (450) some parchment paper and a nice cast iron dutch oven (5 or 6 qt). Follow the recipe below. I doubled it for my oven but used just one packet of yeast (yeast is yeast large or small amounts should not matter.)

Yeast. I buy the 2 pound bulk yeast at Sam's. One goes into the fridge after opening in a sealed plastic container, the other in the cupboard. It takes about a year to use it all and it always rises for me. I don't fuss too much with sponges or proofing. I use lukewarm water or even ice water to rise in the fridge overnight. Even cool water will get a rise after a bit just slower.

I used my Kitchen Aid to mix this cause its really wet dough but you can easily mix it with a large spoon. Very high hydration gives the crust the steam to crisp while baking and creates a great crumb but the bread took longer to bake at double the volume. I always use a thermometer probe to about 200 degrees. So, Tara and Mel and whoever else...this bread's for you.


Watch out while cutting, that crust will fly! This is a double batch. Crusty outside and holey in the crumb. The toast is crazy good. Chewey and crunchy.


Speedy No-Knead Bread

3 cups bread flour
1 1/2 warm water
1 packet ( 1/4 ounce) instant yeast
1 1/2 teaspoons salt
Oil as needed.

1. Combine flour, yeast and salt in a large bowl. Add 1 1/2 cups water and stir
until blended; dough will be shaggy. Cover bowl with plastic wrap. Let dough
rest about 4 hours at warm room temperature, about 70 degrees.

2. Lightly oil a work surface and place dough on it; fold it over on itself once
or twice. (This where I used some parchment to line the bowl to make the transfer easy.) Cover loosely with plastic wrap and let rest 30 minutes more. (I put the dough in a salad bowl lined with the parchment)
3. At least a half-hour before dough is ready, heat oven to 450 degrees. Put a
6-to-8-quart heavy covered pot (cast iron, enamel, Pyrex or ceramic) in oven as
it heats. When dough is ready, carefully remove pot from oven. ( I lifted the parchment and all and dropped it into the hot pot. )  OR you can do this:

Slide your hand under dough and put it into pot, seam side up. Shake pan once or twice if dough
is unevenly distributed; it will straighten out as it bakes.

4. Cover with lid and bake 30 minutes, then remove lid and bake another 15 to 30
minutes, until loaf is beautifully browned. Cool on a rack.

Yield: 1 big loaf.

Sunday, January 1, 2012

New Year's Dinner

Roasted Tenderloin of Beef with Bearnaise,  "Gene's" Potatoes, Caesar Salad, Fresh bread. A meal fit for the grand new start of a Grand New Year.  So nice to have everyone but poor Ben who is working his 2nd of 3 twelve hour shifts. He will be home shortly though and there are plenty of leftovers for him to enjoy. Dessert was a nice Napoleon Torte from the local Lithuanian Bakery. A delicious meal before Brooke had to head to work tonight. Someone, it seems, is always on the move. The life of nurses.

So to start: The Beef

I had a nice 5 pound roast that I tied and seared in a bit of oil. I topped the roast with Dijon, olive oil, peppercorns and rosemary that I stirred into a paste and applied over the roast. Into the oven at 450 for about 35 minutes (meat thermometer firmly in place). I will tell you my new oven is a mess now and the house was a bit smokey. It was at 120 degrees when I pulled it out and reached 135 after 10 minutes of standing. It was perfect.


Now Gene's Potatoes. My Brother in law's brother in law was a chef, perhaps still is. He made these potatoes for some occasion we attended years ago and I have been shamelessly pirating them ever since. I am not even sure if the recipe is anywhere close to his, but I always give him credit. I have used these to cater weddings and dinners for years.

Gene's Potatoes:  Basically a very thick white sauce flavored with Swiss cheese.

4 cans of whole potatoes, drained
2 cups of 1/2 and 1/2
1 t beef /chicken bullion
6 slices or more of processed Swiss Cheese
I use a bit of Wondra to tighten up the sauce or 3 tablespoons of cornstarch in 1/4 cup o water. Should be a heavy cream sauce.

Generally I place all the ingredients in a microwave bowl and nuke till the cheese melts. Stirring every minute or so. Thicken with either cornstarch slurry (1 1/2 T per cup liquid) or Wondra (about 1 good Tablespoon)
The sauce should be very heavy cream consistency.

Place the potatoes in a greased casserole. Pour the sauce over the top, cover and bake 350 till heated through (about 40 minutes) Uncover and bake another 15 minutes to get a bit of color on top.

Now if you have never had canned potatoes, I think you are in for a treat. They are petite and creamy. I use them sometimes for really small batches of potato salad.


The Bearnaise Sauce

I can't have this type of meat without a bit of the rich, tart sauce. So tasty.

1 stick of butter
1 tbl lemon juice
3 egg yolks
1 shallot minced
1 teasp of Tarragon
4 T white wine
2 T Tarragon vinegar

Make the Hollandaise first:
Melt a stick of butter in a 4 cup glass measuring cup. Add the lemon juice to the yolks and beat lightly. Get your stick blender at the ready and start blending the butter. To this add the yolk mixture and blend till light and volume increase.  Set aside.

To a small saucepan, add the remaining vinegar, wine, shallot and tarragon. Allow to reduce to about 2 tablespoons. Get ready to blend again and with the blender running add the reduced mixture to your hollandaise. Now you have Bearnaise. Makes about 1 1/2 cups.


Fresh Bread
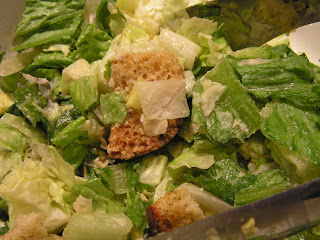
 Caesar Salad

I have made this for a long time and always have used this recipe I pulled from Bernard Schimmel's cookbook from the Joslyn Art Museum. Of course, I can't leave anything alone and added a bit here and there.

1 clove garlic, minced
1 t salt
1/2 t pepper
2 t Dijon mustard
2 good squeezes of anchovy paste
1 lemon,  juiced
1/2 cup olive oil
2 T tarragon vinegar
1 T Worcestershire sauce
1 coddled egg
1/2 cup Parmesan grated

Again I use the stick blender and the 4 cup measure and just mix it all up there.

2 heads of cleaned romaine
Croutons
Shaved Parmesan

LinkWithin

Related Posts Plugin for WordPress, Blogger...